The Android Cuttlefish emulator
March 2022
Cuttlefish is a great way to test Android Open Source (AOSP) builds. It has been around since AOSP 9.0 and yet it is still not very well known. In this post I will give an overview of Cuttlefish, and show how to use it.
Contents
- A tale of two fishes: Cuttlefish and Goldfish
- Installing Cuttlefish
- Building Cuttlefish images
- Running Cuttlefish
- When things go wrong: looking at the log files
- Cheat sheet for launch_cvd
A tale of two fishes: Cuttlefish and Goldfish
When I say "Android emulator", most of you will think of the one that comes with Android Studio that you use for testing applications. That emulator is called Goldfish, and sometimes Ranchu (a Ranchu is a kind of fancy Goldfish). The Goldfish emulator is optimized for testing applications, which is fine if that is what you are doing. But what about those of us who want to develop and test the operating system? Goldfish sort of works, but it misses out important areas of function such as bootstrap. Cuttlefish, on the other hand, is a virtual platform that is designed to replicate actual hardware as closely as possible and so is better if you are testing the platform OS. That is exactly what this post is all about: how to use Cuttlefish to experiment with and test AOSP builds
Cuttlefish runs as a virtual machine on top of either crosvm or QEMU. Crosvm is a virtual machine manager from the ChromeOS project. More information here: https://chromium.googlesource.com/chromiumos/platform/crosvm/
Cuttlefish runs “headless”, meaning that there is no window to show the screen of the emulated device. Instead, you can connect to it at the command-line level using ADB, or you can run a remote desktop and see the screen that way
Cuttlefish only runs on Linux; more specifically on Debian based distributions, and more specifically still, the version of Cuttlefish shipped with AOSP 11 and 12 only works out of the box on Ubuntu 20.04. It is not impossible, I am sure, to make it work on other Linux distros, but it will take time and effort. I have only ever tested it on Ubuntu 20.04
If you want to follow along and try things out, you will need
- An x86_64 PC running Ubuntu 20.04
- Linux KVM (Kernel Virtual Machine) installed and operational
- At least 16 GB RAM – the build will fail with less
- At least 200 GB free disk space, preferably on an SSD
- At least 4 cores, but the more the better. Above 8 cores you need to scale the RAM at the rate of 2GB per core
If you are building in a VM such as VMWare, or a cloud instance, make sure that nested virtualization is enabled so that you can use KVM in the host OS. This is not possible on all VMs. Better still, build on a native install of Ubuntu 20.04
You will know if KVM is installed by checking for the existence of /dev/kvm:
$ ls /dev/kvm
/dev/kvm
Note: this is a red flag: Cuttlefish will not work without it
Installing Cuttlefish
The cuttlefish emulator and run-time are bundled with AOSP, so once you have built one of the "cf" lunch targets, you are ready to go. Except for one thing: you need separately to build and install a Debian package called Cuttlefish Common. So, let’s start there.
Cuttlefish Common
Here are the instructions to build and install cuttlefish-common, taken from https://android.googlesource.com/device/google/cuttlefish/
$ sudo apt install -y git devscripts config-package-dev debhelper-compat golang
$ git clone https://github.com/google/android-cuttlefish
$ cd android-cuttlefish
$ debuild -i -us -uc -b
$ sudo dpkg -i ../cuttlefish-common_*_*64.deb || sudo apt-get install -f
$ sudo usermod -aG kvm,cvdnetwork,render $USER
$ sudo reboot
So, what is that all about? Really cuttlefish-common is just a way to set up and configure an environment for the cuttlefish runtime. If you take a look inside the package, for example with command "dpkg -c cuttlefish-common_0.9.20_amd64.deb", you see:
/etc/default/cuttlefish-common
Configuration file for Cuttlefish. This file contains nothing but comments so everything uses default values, but it's useful to know that it exists
/etc/init.d/cuttlefish-common
Boot script to configure the network interfaces that the Cuttlefish run-time uses
/etc/modules-load.d/cuttlefish-common.conf
Script to load kernel modules vhci-hcd, vhost_net and, vhost_vsock
/lib/udev/rules.d/60-cuttlefish-common.rules
Set mode to 0666 and group to "cvdnetwork" for vhost-net and vhost-vsock
/usr/bin/install_zip.sh
Installs a boot.img
/usr/lib/cuttlefish-common/bin/capability_query.py
Query features present in this version of cuttlefish-common: "capability_check", "qemu_cli", "vsock"
/usr/lib/cuttlefish-common/bin/unpack_boot_image.py
Most Android devices have a bootloader that can interpret the boot.img file. The VMs that Cuttlefish uses don't handle Android's format. This breaks the kernel image, ram disk, and kernel command line into individual files
Building Cuttlefish images
Now we are ready to build AOSP for Cuttlefish
Make sure that you have a system capable of building AOSP in a reasonable amount of time, as described here https://source.android.com/source/building.html. and here https://source.android.com/source/initializing.html
Get AOSP
Choose a directory for the AOSP source, e.g. $HOME/aosp:
$ mkdir $HOME/aosp
$ cd $HOME/aosp
Select the release of AOSP 12 you want, e.g. r26, (the full list of android release tags is here: https://source.android.com/source/build-numbers.html)
$ repo init -u https://android.googlesource.com/platform/manifest -b android-12.0.0_r26
$ repo sync -c
The total download will be about 115 GB
Select a cuttlefish target
Do the usual thing to select a build target:
$ source build/envsetup.sh
$ lunch
Then select one of the cuttlefish targets (they all begin aosp_cf_)
 aosp_cf_arm64_auto-userdebug
 aosp_cf_arm64_phone-userdebug
 aosp_cf_x86_64_phone-userdebug
 aosp_cf_x86_auto-userdebug
 aosp_cf_x86_phone-userdebug
 aosp_cf_x86_tv-userdebug
Fairly obviously, "phone" is a phone, "tv" means Android TV and "auto”"means Android Automotive. I am not going to cover running Cuttlefish on ARM hosts, so you want to select one of the x86_64 or x86 variants
For demonstration purposes, I am using aosp_cf_x86_phone-userdebug. So the full sequence is
$ source build/envsetup.sh
$ lunch aosp_cf_x86_phone-userdebug
$ m
And then wait a few hours to the build to complete. It will consume about 50 GB of disk space, so make sure you have plenty free before you start. When it is done, check that you have a full complement of image files in out/target/product/vsoc_x86. This is what I get:
$ ls *.img
boot-debug.img         ramdisk-debug.img         vbmeta.img
boot.img               ramdisk.img               vbmeta_system.img
boot-test-harness.img  ramdisk-test-harness.img  vendor-bootconfig.img
dtb.img                super_empty.img           vendor_boot-debug.img
metadata.img           super.img                 vendor_boot.img
misc.img               system_ext.img            vendor_boot-test-harness.img
odm_dlkm.img           system.img                vendor_dlkm.img
odm.img                system_other.img          vendor.img
product.img            userdata.img
Running Cuttlefish
Cuttlefish runs a CVD (Cuttlefish Virtual Device) which is a similar concept to the AVD (Android Virtual Device) that the Goldfish emulator uses. AOSP has these commands for manipulating CVDs
- launch_cvd: start a CVD instance
- cvd_status: show the status of running instances
- stop_cvd: stop an instance
I am going to look at several different ways of starting and connecting to Cuttlefish
Launch Cuttlefish and connect with ADB
We can begin with launch_cvd, without any options. This will start the CVD and we will be able to connect to it using ADB, but there will be no graphical display
$ source build/envsetup.sh
$ lunch aosp_cf_x86_phone-userdebug
$ launch_cvd
[...]
init: starting service 'adbd'...
Unable to connect to vsock server: Connection reset by peer
VIRTUAL_DEVICE_BOOT_STARTED
VIRTUAL_DEVICE_NETWORK_MOBILE_CONNECTED
VIRTUAL_DEVICE_BOOT_COMPLETED
Virtual device booted successfully
If you don’t see this, skip on the the section "When things go wrong" below. Assuming all is good, open another terminal window and type:
$ source build/envsetup.sh
$ lunch aosp_cf_x86_phone-userdebug
Then, get the status, just to confirm that it is running:
$ cvd_status
cvd_status I 02-13 20:14:27 34974 34974 cvd_status.cc:109] run_cvd is active.
Check that there is an ADB device available
$ adb devices
List of devices attached
0.0.0.0:6520	device
Now open a shell on Cuttlefish and read the build description
$ adb shell
vsoc_x86:/ $ getprop ro.build.description
vsoc_x86-userdebug 12 SQ1A.220105.002 eng.chris.20220208.155855 test-keys
Exit the ADB shell by typing ”exit” or CTRL-D
Stop the CVD
$ stop_cvd
stop_cvd I 02-13 20:14:37 34975 34975 main.cc:195] Successfully stopped device 0.0.0.0:6520
All is good so far. In the next two sections we will show the device display
Launch Cuttlefish with WebRTC remote desktop
This is the way Google recommend to show the display, although I prefer the lighter weight VNC viewer which is in the next section
Start Cuttlefish with the WebRTC interface:
$ launch_cvd -start_webrtc
You will see this text in the messages printed out by launch_cvd:
Point your browser to https://0.0.0.0:8443 to interact with the device.
This is telling you that there is a server, webrtc_operator, listening on port 8443. The home page and other assets are in out/soong/host/linux-x86/usr/share/webrtc. Launch a browser (must be Chrome or Chromium) and enter URL https://localhost:8443.
Initially you see a page that says "Your connection is not private". Click the "Advanced" button, then click on "Proceed to localhost (unsafe)"
You should see this page:
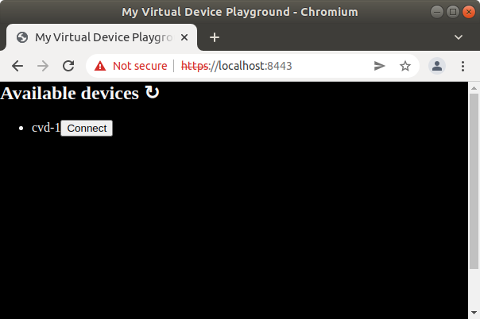
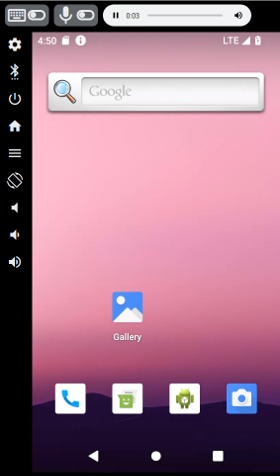
Click on the "Connect" button and you should see the device screen in the browser:
Launch Cuttlefish with VNC remote desktop
The VNC view shows just the screen. It lacks the controls that the WebRTC desktop has, but it’s lighter weight and doesn’t depend on having a Chrome browser
You will need a VNC client, such as remmina, vinagre, or tightvnc. I am using the Java tightvnc viewer in the examples below
Download the latest tightvnc viewer from https://tightvnc.com/download.html:
$ curl -O https://www.tightvnc.com/download/2.8.3/tvnjviewer-2.8.3-bin-gnugpl.zip
$ unzip tvnjviewer-2.8.3-bin-gnugpl.zip
Start Cuttlefish with the VNC server:
$ launch_cvd -start_vnc_server
You will see this text in the messages printed out by launch_cvd:
VNC server started on port 6444
Next, start your VNC client and connect to port 6444. I do it like this:
$ java -jar /[path to]/tightvnc-jviewer.jar
-ShowControls=No
-ScalingFactor=75
-showConnectionDialog=No
localhost 6444
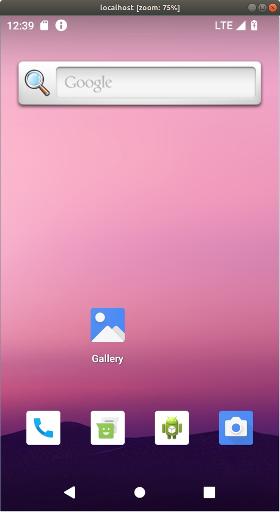
These settings give you a bare, unadorned window showing the device display:
- -ShowControls=No: remove all adornments
- -ScalingFactor=75: scale to 75% so it fits on the screen, you may need to tweak this
- -showConnectionDialog: just make the connection without any prompts
It looks like this:
A script to launch Cuttlefish and VNC on one go
I use this script to combine launching Cuttlefish and the VNC client
#!/bin/bash
launch_cvd -start_vnc_server $* &
sleep 8
java -jar /[path to]/tightvnc-jviewer.jar -ShowControls=No -ScalingFactor=75 -showConnectionDialog=No localhost 6444
stop_cvd
It runs launch_cvd as a background process, passing any parameters from the script. Then there is an arbitrary 8 second delay to let the cvd get started, after which it starts the tightvnc viewer. When the viewer window is closed, it stops the cvd
Serial console and bootloader
The text written to the console is captured in $HOME/cuttlefish_runtime/kernel.log. This includes output from the bootloader, U-Boot, as well as Linux. You can monitor it with:
$ tail -f $HOME/cuttlefish_runtime/kernel.log
You can also get an interactive console (so that you can input commands as well as looking at the output) by adding -console to launch_cvd and then connecting a terminal emulator to $HOME/cuttlefish_runtime/console. The most obvious reason for wanting to do this is to interact with the bootloader, for which you need to add -pause-in-bootloader=true. For example:
$ launch_cvd -console=true -pause-in-bootloader=true
In another terminal, verify that the console device exists:
$ ls -l $HOME/cuttlefish_runtime/console
lrwxrwxrwx 1 chris chris 10 Dec 16 15:02 /home/chris/cuttlefish_runtime/console -> /dev/pts/4
You need a terminal emulator program, such as screen, minicom or gtkterm. In the examples here I am using screen:
$ screen $HOME/cuttlefish_runtime/console
Now you should be talking to U-Boot:
=> version
U-Boot 2021.01-07989-g74c21be757 (May 10 2021 - 19:57:34 +0000)
Android (6443078 based on r383902) clang version 11.0.1 (https://android.googlesource.com/to
olchain/llvm-project b397f81060ce6d701042b782172ed13bee898b79)
GNU ld (binutils-2.27-bd24d23f) 2.27.0.20170315
=>
=> help
?         - alias for 'help'
ab_select - Select the slot used to boot from and register the boot attempt.
[...]
Using screen
The hotkey sequence is Ctrl-A followed by a character [press the Ctrl and a keys together, then release both. Then press the action character]
Ctrl-A ?    Help
Ctrl-A      Exit screen
The scroll history buffer (scrollback mode) in screen is a bit strange. You have to :
- type Ctrl-A Esc
- Press the ”Up” and ”Down” arrow keys or the ”PgUp” and ”PgDn” keys to scroll through previous output
- Press ”Esc” to exit scrollback mode
When things go wrong: looking at the log files
When you run launch_cvd it generates these directories in $HOME
cuttlefish_assembly/     intermediate files
cuttlefish_runtime/      symbolic link to the current instance
cuttlefish_runtime.1/    the current instance
Directory cuttlefish_runtime.1 contains these useful log files:
launcher.log             log files from launch_cvd
kernel.log               console log, including messages from boot loader and kernel
logcat                   Android logcat
Cheat sheet for launch_cvd
launch_cvd has many, many options. Here is a shorter list of those that I find useful
| -start_vnc_server | Start VNC server on port 6444 |
| -start_webrtc | Start web UI on https://localhost:8443 |
| -console=true | Start console interface cuttlefish_runtime/console |
| -daemon | Daemon mode (run as a background process) |
| -pause-in-bootloader=true | Access bootloader via serial console |
| -x_res | screen width |
| -y_res | screen height |
| -dpi | screen resolution |
| -guest_enforce_security=false | SELinux in permissive mode |
| -extra_kernel_cmdline "" | additional Linux command line |
| -cpus | Number of CPUs to emulate |
| -memory_mb | amount of memory to give to device |
| -noresume | Start a new runtime: factory reset |
Conclusion
Cuttlefish is designed to emulate a real world Android device a closely as possible, making is a much better platform for testing AOSP builds than Goldfish. Most of the testing done by the Android OS team seems to be done using Cuttlefish, which is shown by the fact that in AOSP 12 the Cuttlefish targets build and run with out trouble, but the Goldfish targets (aosp_arm, aosp_arm64, aosp_x86, and aosp_x86_64) are often broken
If you have not already, give Cuttlefish a try
Chris Simmonds
T: @2net_software
L: https://uk.linkedin.com/in/chrisdsimmonds/
 Twitter
 GitHub