The web site for the AOSP and AAOS Meetup has moved to https://aospandaaos.github.io/
03/08/2022 - 10:27
March 2022
Cuttlefish is a great way to test Android Open Source (AOSP) builds. It has been around since AOSP 9.0 and yet it is still not very well known. In this post I will give an overview of Cuttlefish, and show how to use it.
Contents
- A tale of two fishes: Cuttlefish and Goldfish
- Installing Cuttlefish
- Building Cuttlefish images
- Running Cuttlefish
- When things go wrong: looking at the log files
- Cheat sheet for launch_cvd
A tale of two fishes: Cuttlefish and Goldfish
When I say "Android emulator", most of you will think of the one that comes with Android Studio that you use for testing applications. That emulator is called Goldfish, and sometimes Ranchu (a Ranchu is a kind of fancy Goldfish). The Goldfish emulator is optimized for testing applications, which is fine if that is what you are doing. But what about those of us who want to develop and test the operating system? Goldfish sort of works, but it misses out important areas of function such as bootstrap. Cuttlefish, on the other hand, is a virtual platform that is designed to replicate actual hardware as closely as possible and so is better if you are testing the platform OS. That is exactly what this post is all about: how to use Cuttlefish to experiment with and test AOSP builds
Cuttlefish runs as a virtual machine on top of either crosvm or QEMU. Crosvm is a virtual machine manager from the ChromeOS project. More information here: https://chromium.googlesource.com/chromiumos/platform/crosvm/
Cuttlefish runs “headless”, meaning that there is no window to show the screen of the emulated device. Instead, you can connect to it at the command-line level using ADB, or you can run a remote desktop and see the screen that way
Cuttlefish only runs on Linux; more specifically on Debian based distributions, and more specifically still, the version of Cuttlefish shipped with AOSP 11 and 12 only works out of the box on Ubuntu 20.04. It is not impossible, I am sure, to make it work on other Linux distros, but it will take time and effort. I have only ever tested it on Ubuntu 20.04
If you want to follow along and try things out, you will need
- An x86_64 PC running Ubuntu 20.04
- Linux KVM (Kernel Virtual Machine) installed and operational
- At least 16 GB RAM – the build will fail with less
- At least 200 GB free disk space, preferably on an SSD
- At least 4 cores, but the more the better. Above 8 cores you need to scale the RAM at the rate of 2GB per core
If you are building in a VM such as VMWare, or a cloud instance, make sure that nested virtualization is enabled so that you can use KVM in the host OS. This is not possible on all VMs. Better still, build on a native install of Ubuntu 20.04
You will know if KVM is installed by checking for the existence of /dev/kvm:
$ ls /dev/kvm
/dev/kvm
Note: this is a red flag: Cuttlefish will not work without it
Installing Cuttlefish
The cuttlefish emulator and run-time are bundled with AOSP, so once you have built one of the "cf" lunch targets, you are ready to go. Except for one thing: you need separately to build and install a Debian package called Cuttlefish Common. So, let’s start there.
Cuttlefish Common
Here are the instructions to build and install cuttlefish-common, taken from https://android.googlesource.com/device/google/cuttlefish/
$ sudo apt install -y git devscripts config-package-dev debhelper-compat golang
$ git clone https://github.com/google/android-cuttlefish
$ cd android-cuttlefish
$ debuild -i -us -uc -b
$ sudo dpkg -i ../cuttlefish-common_*_*64.deb || sudo apt-get install -f
$ sudo usermod -aG kvm,cvdnetwork,render $USER
$ sudo reboot
So, what is that all about? Really cuttlefish-common is just a way to set up and configure an environment for the cuttlefish runtime. If you take a look inside the package, for example with command "dpkg -c cuttlefish-common_0.9.20_amd64.deb", you see:
/etc/default/cuttlefish-common
Configuration file for Cuttlefish. This file contains nothing but comments so everything uses default values, but it's useful to know that it exists
/etc/init.d/cuttlefish-common
Boot script to configure the network interfaces that the Cuttlefish run-time uses
/etc/modules-load.d/cuttlefish-common.conf
Script to load kernel modules vhci-hcd, vhost_net and, vhost_vsock
/lib/udev/rules.d/60-cuttlefish-common.rules
Set mode to 0666 and group to "cvdnetwork" for vhost-net and vhost-vsock
/usr/bin/install_zip.sh
Installs a boot.img
/usr/lib/cuttlefish-common/bin/capability_query.py
Query features present in this version of cuttlefish-common: "capability_check", "qemu_cli", "vsock"
/usr/lib/cuttlefish-common/bin/unpack_boot_image.py
Most Android devices have a bootloader that can interpret the boot.img file. The VMs that Cuttlefish uses don't handle Android's format. This breaks the kernel image, ram disk, and kernel command line into individual files
Building Cuttlefish images
Now we are ready to build AOSP for Cuttlefish
Make sure that you have a system capable of building AOSP in a reasonable amount of time, as described here https://source.android.com/source/building.html. and here https://source.android.com/source/initializing.html
Get AOSP
Choose a directory for the AOSP source, e.g. $HOME/aosp:
$ mkdir $HOME/aosp
$ cd $HOME/aosp
Select the release of AOSP 12 you want, e.g. r26, (the full list of android release tags is here: https://source.android.com/source/build-numbers.html)
$ repo init -u https://android.googlesource.com/platform/manifest -b android-12.0.0_r26
$ repo sync -c
The total download will be about 115 GB
Select a cuttlefish target
Do the usual thing to select a build target:
$ source build/envsetup.sh
$ lunch
Then select one of the cuttlefish targets (they all begin aosp_cf_)
 aosp_cf_arm64_auto-userdebug
 aosp_cf_arm64_phone-userdebug
 aosp_cf_x86_64_phone-userdebug
 aosp_cf_x86_auto-userdebug
 aosp_cf_x86_phone-userdebug
 aosp_cf_x86_tv-userdebug
Fairly obviously, "phone" is a phone, "tv" means Android TV and "auto”"means Android Automotive. I am not going to cover running Cuttlefish on ARM hosts, so you want to select one of the x86_64 or x86 variants
For demonstration purposes, I am using aosp_cf_x86_phone-userdebug. So the full sequence is
$ source build/envsetup.sh
$ lunch aosp_cf_x86_phone-userdebug
$ m
And then wait a few hours to the build to complete. It will consume about 50 GB of disk space, so make sure you have plenty free before you start. When it is done, check that you have a full complement of image files in out/target/product/vsoc_x86. This is what I get:
$ ls *.img
boot-debug.img         ramdisk-debug.img         vbmeta.img
boot.img               ramdisk.img               vbmeta_system.img
boot-test-harness.img  ramdisk-test-harness.img  vendor-bootconfig.img
dtb.img                super_empty.img           vendor_boot-debug.img
metadata.img           super.img                 vendor_boot.img
misc.img               system_ext.img            vendor_boot-test-harness.img
odm_dlkm.img           system.img                vendor_dlkm.img
odm.img                system_other.img          vendor.img
product.img            userdata.img
Running Cuttlefish
Cuttlefish runs a CVD (Cuttlefish Virtual Device) which is a similar concept to the AVD (Android Virtual Device) that the Goldfish emulator uses. AOSP has these commands for manipulating CVDs
- launch_cvd: start a CVD instance
- cvd_status: show the status of running instances
- stop_cvd: stop an instance
I am going to look at several different ways of starting and connecting to Cuttlefish
Launch Cuttlefish and connect with ADB
We can begin with launch_cvd, without any options. This will start the CVD and we will be able to connect to it using ADB, but there will be no graphical display
$ source build/envsetup.sh
$ lunch aosp_cf_x86_phone-userdebug
$ launch_cvd
[...]
init: starting service 'adbd'...
Unable to connect to vsock server: Connection reset by peer
VIRTUAL_DEVICE_BOOT_STARTED
VIRTUAL_DEVICE_NETWORK_MOBILE_CONNECTED
VIRTUAL_DEVICE_BOOT_COMPLETED
Virtual device booted successfully
If you don’t see this, skip on the the section "When things go wrong" below. Assuming all is good, open another terminal window and type:
$ source build/envsetup.sh
$ lunch aosp_cf_x86_phone-userdebug
Then, get the status, just to confirm that it is running:
$ cvd_status
cvd_status I 02-13 20:14:27 34974 34974 cvd_status.cc:109] run_cvd is active.
Check that there is an ADB device available
$ adb devices
List of devices attached
0.0.0.0:6520	device
Now open a shell on Cuttlefish and read the build description
$ adb shell
vsoc_x86:/ $ getprop ro.build.description
vsoc_x86-userdebug 12 SQ1A.220105.002 eng.chris.20220208.155855 test-keys
Exit the ADB shell by typing ”exit” or CTRL-D
Stop the CVD
$ stop_cvd
stop_cvd I 02-13 20:14:37 34975 34975 main.cc:195] Successfully stopped device 0.0.0.0:6520
All is good so far. In the next two sections we will show the device display
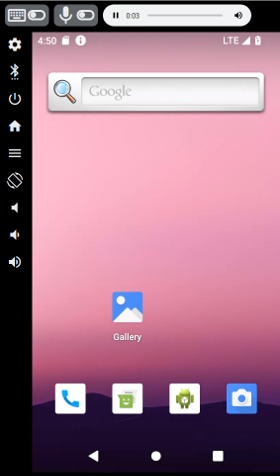
Launch Cuttlefish with WebRTC remote desktop
This is the way Google recommend to show the display, although I prefer the lighter weight VNC viewer which is in the next section
Start Cuttlefish with the WebRTC interface:
$ launch_cvd -start_webrtc
You will see this text in the messages printed out by launch_cvd:
Point your browser to https://0.0.0.0:8443 to interact with the device.
This is telling you that there is a server, webrtc_operator, listening on port 8443. The home page and other assets are in out/soong/host/linux-x86/usr/share/webrtc. Launch a browser (must be Chrome or Chromium) and enter URL https://localhost:8443.
Initially you see a page that says "Your connection is not private". Click the "Advanced" button, then click on "Proceed to localhost (unsafe)"
You should see this page:
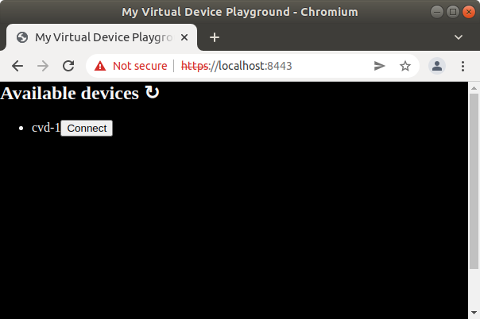
Click on the "Connect" button and you should see the device screen in the browser:
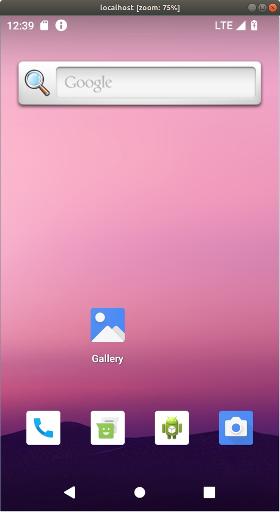
Launch Cuttlefish with VNC remote desktop
The VNC view shows just the screen. It lacks the controls that the WebRTC desktop has, but it’s lighter weight and doesn’t depend on having a Chrome browser
You will need a VNC client, such as remmina, vinagre, or tightvnc. I am using the Java tightvnc viewer in the examples below
Download the latest tightvnc viewer from https://tightvnc.com/download.html:
$ curl -O https://www.tightvnc.com/download/2.8.3/tvnjviewer-2.8.3-bin-gnugpl.zip
$ unzip tvnjviewer-2.8.3-bin-gnugpl.zip
Start Cuttlefish with the VNC server:
$ launch_cvd -start_vnc_server
You will see this text in the messages printed out by launch_cvd:
VNC server started on port 6444
Next, start your VNC client and connect to port 6444. I do it like this:
$ java -jar /[path to]/tightvnc-jviewer.jar
-ShowControls=No
-ScalingFactor=75
-showConnectionDialog=No
localhost 6444
These settings give you a bare, unadorned window showing the device display:
- -ShowControls=No: remove all adornments
- -ScalingFactor=75: scale to 75% so it fits on the screen, you may need to tweak this
- -showConnectionDialog: just make the connection without any prompts
It looks like this:
A script to launch Cuttlefish and VNC on one go
I use this script to combine launching Cuttlefish and the VNC client
#!/bin/bash
launch_cvd -start_vnc_server $* &
sleep 8
java -jar /[path to]/tightvnc-jviewer.jar -ShowControls=No -ScalingFactor=75 -showConnectionDialog=No localhost 6444
stop_cvd
It runs launch_cvd as a background process, passing any parameters from the script. Then there is an arbitrary 8 second delay to let the cvd get started, after which it starts the tightvnc viewer. When the viewer window is closed, it stops the cvd
Serial console and bootloader
The text written to the console is captured in $HOME/cuttlefish_runtime/kernel.log. This includes output from the bootloader, U-Boot, as well as Linux. You can monitor it with:
$ tail -f $HOME/cuttlefish_runtime/kernel.log
You can also get an interactive console (so that you can input commands as well as looking at the output) by adding -console to launch_cvd and then connecting a terminal emulator to $HOME/cuttlefish_runtime/console. The most obvious reason for wanting to do this is to interact with the bootloader, for which you need to add -pause-in-bootloader=true. For example:
$ launch_cvd -console=true -pause-in-bootloader=true
In another terminal, verify that the console device exists:
$ ls -l $HOME/cuttlefish_runtime/console
lrwxrwxrwx 1 chris chris 10 Dec 16 15:02 /home/chris/cuttlefish_runtime/console -> /dev/pts/4
You need a terminal emulator program, such as screen, minicom or gtkterm. In the examples here I am using screen:
$ screen $HOME/cuttlefish_runtime/console
Now you should be talking to U-Boot:
=> version
U-Boot 2021.01-07989-g74c21be757 (May 10 2021 - 19:57:34 +0000)
Android (6443078 based on r383902) clang version 11.0.1 (https://android.googlesource.com/to
olchain/llvm-project b397f81060ce6d701042b782172ed13bee898b79)
GNU ld (binutils-2.27-bd24d23f) 2.27.0.20170315
=>
=> help
?         - alias for 'help'
ab_select - Select the slot used to boot from and register the boot attempt.
[...]
Using screen
The hotkey sequence is Ctrl-A followed by a character [press the Ctrl and a keys together, then release both. Then press the action character]
Ctrl-A ?    Help
Ctrl-A      Exit screen
The scroll history buffer (scrollback mode) in screen is a bit strange. You have to :
- type Ctrl-A Esc
- Press the ”Up” and ”Down” arrow keys or the ”PgUp” and ”PgDn” keys to scroll through previous output
- Press ”Esc” to exit scrollback mode
When things go wrong: looking at the log files
When you run launch_cvd it generates these directories in $HOME
cuttlefish_assembly/     intermediate files
cuttlefish_runtime/      symbolic link to the current instance
cuttlefish_runtime.1/    the current instance
Directory cuttlefish_runtime.1 contains these useful log files:
launcher.log             log files from launch_cvd
kernel.log               console log, including messages from boot loader and kernel
logcat                   Android logcat
Cheat sheet for launch_cvd
launch_cvd has many, many options. Here is a shorter list of those that I find useful
| -start_vnc_server | Start VNC server on port 6444 |
| -start_webrtc | Start web UI on https://localhost:8443 |
| -console=true | Start console interface cuttlefish_runtime/console |
| -daemon | Daemon mode (run as a background process) |
| -pause-in-bootloader=true | Access bootloader via serial console |
| -x_res | screen width |
| -y_res | screen height |
| -dpi | screen resolution |
| -guest_enforce_security=false | SELinux in permissive mode |
| -extra_kernel_cmdline "" | additional Linux command line |
| -cpus | Number of CPUs to emulate |
| -memory_mb | amount of memory to give to device |
| -noresume | Start a new runtime: factory reset |
Conclusion
Cuttlefish is designed to emulate a real world Android device a closely as possible, making is a much better platform for testing AOSP builds than Goldfish. Most of the testing done by the Android OS team seems to be done using Cuttlefish, which is shown by the fact that in AOSP 12 the Cuttlefish targets build and run with out trouble, but the Goldfish targets (aosp_arm, aosp_arm64, aosp_x86, and aosp_x86_64) are often broken
If you have not already, give Cuttlefish a try
Chris Simmonds
T: @2net_software
L: https://uk.linkedin.com/in/chrisdsimmonds/
10/31/2021 - 18:43
This is the first in a series of blogs about Android Automotive OS
What is Android Automotive OS?
Android Automotive OS (AAOS) is a version of Android designed to run in a vehicle head unit and provide the “In Vehicle Infotainment” (IVI) system. In modern vehicles, the IVI system controls the heating and ventilation, provides audio streaming, shows the rear-view (and side view) cameras, offers navigation … and many other things besides.
The core of AAOS is part of the Android Open Source Project (AOSP), and since it is open source anyone can use the code to create an IVI product. But don’t get too carried away with that thought. The code in AOSP is just the bare bones, with a very basic home screen and a few “demo quality” apps for music, heating controls and such like. An auto manufacturer still has a lot of work to do before they have a viable product.
Of course, Google has a solution. They license a set of proprietary APIs called Google Automotive Services, or GAS. This is similar to Google Mobile Services (GMS) in the mobile world: GAS provides Play Store, Google Navigation, and Google Assistant (for voice activation and hands-free driving), among other things. The first vehicle to be sold with AAOS in the head unit was the Polestar 2 in March 2020, which includes GAS and the full suite of Google services. But, GAS is a little controversial in the automotive world because of the loss of control the Google license implies, not to mention sharing valuable data with Google which the auto manufacturers would rather keep to themselves. Expect to see versions of AAOS without GAS in the near future.
Note that Google have another product with a similar name: Android Auto. This is a completely different beast. The Auto app runs on a normal Android phone and uses a USB or (recently) WiFi connection to the head unit. The head unit is NOT running Android. In most cases it is actually running an embedded Linux operating system developed by the vehicle manufacturer. This blog is absolutely NOT about Android Auto
Why AAOS?
“Why” is always the more difficult question. My observations are twofold
The attraction from the car manufacturer’s point of view is that AAOS will reduce development and maintenance costs. Most cars on the market today have an IVI system that is developed in-house, or in partnership with a Tier 1 software provider. Development is expensive and slow. On the other hand, AAOS is an off-the-shelf solution with a full set of media codecs, a suite of apps (if you license GAS), and a fantastic developer network. Also, it is much easier (cheaper) to hire Android developers than C++ developers who know the Qt programming environment
AAOS is also a win for customers. The current crop of IVI systems don’t have a great reputation for usability, whereas AAOS has the familiar Android UX and the ability to install new apps from an app store. On that last point, the experience here will depend on whether the manufacturer has licensed GAS or not. If not, there will probably still be some kind of app store, just not the full Google Play Store.
Architecture
AAOS is an add-on to normal Android. The main components are the vehicle HAL, Car Service and Car Manager, as shown here:

Starting from the bottom, we have the Electronic Control Units (ECUs). They are part of the vehicle. They monitor and control every aspect of the vehicle. They are connected to a vehicle bus, usually a CAN bus.
On the Android side of the vehicle bus we have the Vehicle Hardware Abstraction Layer (VHAL), which represents signals from the bus as vehicle properties. There are over 150 pre-defined “system” properties in Android 12. For example, there is one named PERF_VEHICLE_SPEED which represents the speed in metres per second. OEMs can add their own “vendor” properties.
The Car Service takes vehicle properties and adds information from other sources to create a set of services that are useful to applications.
Applications do not call the Car Service directly. Rather, they call the Car Manager library, which implements the android.car.* packages (https://developer.android.com/reference/android/car/packages). There are some demo car apps in AOSP which show how the android.car classes are meant to be used. These apps are mostly system apps, which is to say that they are written by the manufacturer and provided pre-installed with the vehicle. They can access low level functions, such as lowering and raising the side windows.
Finally, we have third party Auto apps that you can install from Play Store – or another app store. They are quite limited in the parts of the car they can access and must follow guidelines to avoid driver distraction. These are things like streaming music, audio books and navigation. For more information, look at https://developer.android.com/training/cars/start
The Automotive user interface
AAOS is designed to be easy to use while driving. It has a simple tile-based UI with large icons. Here is a screenshot of the default UI from AOSP 12, with the navigation bar at the bottom and status bar at the top
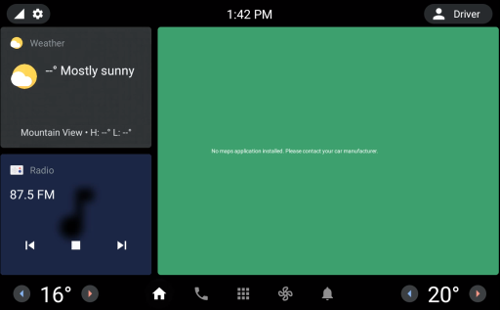
The icons on the navigation bar are Home, Phone, Apps, HVAC, and Notifications. The Apps icon takes you to the app menu where you will find the pre-installed system apps plus any that you have installed yourself. The gear wheel at the top left takes you into a simplified settings menu, and touching the user icon top right allows you to say who is driving the car.
You will almost certainly never see an actual vehicle with this layout. This is where vehicle manufactures are encouraged to stamp their own branding and UX. For example, the Polestar 2 implementation is very different to the default.
Conclusion
From my experience it seems that the majority of auto manufactures are integrating AAOS into their cars: AAOS is going to be in a vehicle near you quite soon. This is going to be a learning curve, not only for the auto makers, but also for the Android developers as they add features to cope with the automotive environment.
09/12/2017 - 11:24
This is a problem that I ran across recently. Building the whole AOSP code base is a big task, and normally you would choose a machine with plenty of RAM. But, sometimes you need to build on a lesser machine. It happened to me when I was on the road and I wanted to run a build on my laptop, which has 8 GiB RAM, and a dual core hyper-threaded Intel i7 CPU. I have used this set up with Marshmallow and earlier versions without problem – it just takes a while, that’s all.
Contents
The problem
The problem manifests itself as a failed build after 90 minutes or so with a message similar to this:
[ 45% 16221/35670] Building with Jack:...k_intermediates/with-local/classes.dex
FAILED: /bin/bash out/target/common/obj/JAVA_LIBRARIES/framework_intermediates/with-local/classes.dex.rsp
Out of memory error (version 1.2-rc4 'Carnac' (298900 f95d7bdecfceb327f9d201a1348397ed8a843843 by android-jack-team@google.com)).
GC overhead limit exceeded.
Try increasing heap size with java option '-Xmx'.
Warning: This may have produced partial or corrupted output.
[ 45% 16221/35670] Building with Jack:...colorpicker_intermediates/classes.jack
ninja: build stopped: subcommand failed.
build/core/ninja.mk:148: recipe for target 'ninja_wrapper' failed
make: *** [ninja_wrapper] Error 1

#### make failed to build some targets (01:26:54 (hh:mm:ss)) ####
The root of the problem is that jack-server (not Jack itself) has run out of heap. So, what is jack-server?
Some background information on Jack and jack-server
Jack is an Android toolchain that compiles Java source into Android dex bytecode. It replaces the previous Android toolchain, which consists of multiple tools, such as javac, ProGuard, jarjar, and dx. Jack is used from Marshmallow onwards.
In Nougat, jack-server was introduced to handle a pool of Jack compiler instances in order to limit memory usage and benefit from already warm instances. Jack-server is written in Java and is run in a Java VM. It is installed into ~/.jack-server when you run the first AOSP build.
The Java heap
AOSP 7 requires OpenJDK 8 to build. I took these measurements using OpenJDK 8, version 1.8.0_131 on Ubuntu 16.04.2:
$ java -version
openjdk version "1.8.0_131"
OpenJDK Runtime Environment (build 1.8.0_131-8u131-b11-2ubuntu1.16.04.3-b11)
OpenJDK 64-Bit Server VM (build 25.131-b11, mixed mode)
Now, let’s look at the default heap size on two different machines. The default heap size scales according to the total amount of memory fitted, ignoring the swap space. On a 16 GiB machine, it is over 3 GiB:
$ java -XshowSettings 2>&1  | grep Heap
    Max. Heap Size (Estimated): 3.47G
But, on an 8 GiB machine, it is less than 2 GiB:
$ java -XshowSettings 2>&1  | grep Heap
    Max. Heap Size (Estimated): 1.71G
It turns out that jack-server needs about 3 GiB to build a typical AOSP Nougat target, and so it fails if the machine doesn’t have enough RAM. Increasing the swap space makes no difference.
Jack-server is launched by a shell script named jack-admin which is in the prebuilts/sdk/tools directory. Digging around a little in there, I found the default arguments for the server (line 29)
JACK_SERVER_VM_ARGUMENTS="${JACK_SERVER_VM_ARGUMENTS:=-Dfile.encoding=UTF-8 -XX:+TieredCompilation}"
Lower down, I found the point that it launches jack-server (line 454)
JACK_SERVER_COMMAND="java -XX:MaxJavaStackTraceDepth=-1 -Djava.io.tmpdir=$TMPDIR $JACK_SERVER_VM_ARGUMENTS -cp $LAUNCHER_JAR $LAUNCHER_NAME"
      echo "Launching Jack server" $JACK_SERVER_COMMAND
That is all I needed to know. Now we can move on to the solution.
The solution
Once I understood the problem, it was just a question of changing the default heap size when jack-server is launched. To fix it, you need to edit
~/.jack-settings, and add this line
JACK_SERVER_VM_ARGUMENTS="-Dfile.encoding=UTF-8 -XX:+TieredCompilation -Xmx4096m"
Then, restart jack-server – otherwise if it is running in the background it will continue to use the old Xmx value:
$ prebuilts/sdk/tools/jack-admin kill-server
$ prebuilts/sdk/tools/jack-admin start-server
Launching Jack server java -XX:MaxJavaStackTraceDepth=-1 -Djava.io.tmpdir=/tmp -Dfile.encoding=UTF-8 -XX:+TieredCompilation -Xmx4096m
-cp /home/chris/.jack-server/launcher.jar com.android.jack.launcher.ServerLauncher
Then you can build AOSP 7.x on an 8 GiB machine. The build is not fast – a little less than 3 hours for me - but at least it completes.
For more information about Android and AOSP, you may want to consider one of my in-depth training courses:
Android Porting and Android Internals.
Chris Simmonds, Author, trainer, consultant.
10/05/2016 - 10:36
Chris Simmonds has been working on ports of Android to the BeagleBone Black for several years, since he posted the first tutorial on running JellyBean 4.3.
Now all of that work has been consolidated into the Android4Beagle project. Android4Beagle aims to provide a vanilla Android build, based on AOSP. Currently, builds are available for KitKat, Lollipop and Marshmallow, with Nougat in the works.
10/05/2016 - 10:20
Chris Simmonds will be at the at OpenIoT Summit and Embedded Linux Conference Europe 2016. This year he will be giving two presentations:
- Read-only rootfs: Theory and Practice http://sched.co/7rsh
- Software Update for IoT: The Current State of Play http://sched.co/7rrJ
He will be posting links to the presentations just as soon as he has finished writing them. Hope to see you there!
03/22/2016 - 11:07
Update: Brillo was abandoned by Google in December 2016 in favour of Android Things
Brillo (https://developers.google.com/brillo/) is Google's operating system for devices that are connected to the IoT. They communicate with each other, with the cloud and with mobile apps using a system called Weave (https://developers.google.com/weave/). Brillo and Weave are still under wraps: you have to request an invite from the two links in order to get access to documentation, sample code, and so on. However, there is enough information publicly available to build and test a device running Brillo, which is what this blog is about. I hope to cover Weave in a later post.
Brillo is actually a cut-down version of Android. Basically, all the Java components have been stripped away leaving a much simpler embedded Linux operating system. When building Brillo, some things pop out immediately, which may give a preview of future Android builds:
- GNU make is out: the build is run by kati/ninja (same for Android N preview)
- GCC is out: almost all C/C++ components are compiled using clang (same for Android N preview)
- Linux kernel source is in: the AOSP tree has vendor kernels in hardware/bsp/kernel. The kernel is built using GCC, as it is not (yet) possible to build it with clang
- DBUS is in: I have not yet found out why
- Toybox is in: leading to a much more Linux-like command line experience
Below, I show how to build and run the Brillo emulator
Setting up the build system
This is basically the same as building Android from AOSP: the instructions are here http://source.android.com/source/initializing.html. I used a fairly old octocore AMD machine with 16 GiB RAM running Ubuntu 14.04.4 64-bit desktop. Note that although Brillo targets do not contain any Java code, the build fails at the very beginning if you don't have OpenJDK 1.7 installed.
Getting the code
The Brillo code was pushed to AOSP in November 2015. I will start by syncing the master branch:
$ repo init -u https://android.googlesource.com/brillo/manifest
$ repo sync
Allow a while for that to complete because it has 34 GiB to download.
Building the emulator
The procedure is basically the same as for any AOSP build:
$ . build/envsetup.sh
$ lunch
Select brilloemulator_x86-eng (or, run lunch brilloemulator_x86-eng). Then build it using make, giving the number of CPU cores on the build machine as the -j parameter:
$ make -j8
The first thing you notice is this:
Running kati to generate build-brilloemulator_x86.ninja...
Kati is a GNU make clone which converts the many thousands of makefile snippets in an Android build into a single, huge, ninja file:
$ ls -lh out/build-brilloemulator_x86.ninja
-rw-rw-r-- 1 chris chris 145M Mar 21 15:27 out/build-brilloemulator_x86.ninja
The main goal, apparently, is to speed-up incremental build of Android. There is some info in the README.md file at https://github.com/google/kati. To speed up incremental builds, and make them more robust, kati writes the timestamps of all the files and directories to a file, so that it only has to re-read the makefiles if something has changed:
$ ls -lh out/.kati_stamp-brilloemulator_x86
-rw-rw-r-- 1 chris chris 12M Mar 21 15:27 out/.kati_stamp-brilloemulator_x86
The ninja file is processed by Ninja, which is a simple build system that builds according to the rules in the input file. See https://ninja-build.org/
One nice touch is that when the build gets going, you see a nice progress indicator:
[ 44% 7550/16800] target ..........................
Towards the end, it builds a kernel:
[ 95% 15960/16800] Building i386 4.4 kernel...
This is a big deal. This step is optional, in that you can set up the device build files to copy a prebuilt kernel binary as with “old” AOSP builds, but the clear intention is that the kernel source is part of the archive. In hardware/bsp/kernel there are kernels for freescale, imagination, intel, marvell qcom, and rockchip. I just can't exaggerate how pleased I am about this.
Finally, you should see this message :
#### make completed successfully (34:37 (mm:ss)) ####
The build time is quite a lot shorter than for contemporary Android builds, mostly because there is less to build, but also because of the new build system.
Running the emulator
The emulator a version of QEMU. You start it like this (assuming that you have previously sourced build/envsetup.sh and selected the target via the lunch command):
$ brilloemulator-x86
Before I go on, note that quitting the emulator is, maybe, not obvious. Remember that it is just a copy of QEMU that was started without a graphics screen (-nographic). So, to quit you type Ctrl-A X. That is, you press the Ctrl and A keys together, let go, and then press the X key, and you will see:
QEMU: Terminated
Using Brillo at the command line feels much more Linux-y than earlier versions of Android, courtesy of Toybox (http://www.landley.net/toybox/). Toybox largely replaces the earlier command line tool called Toolbox. Now, commands such as “find”, “which”, and “uname” all work as on regular Linux. Even “ifconfig” works as it should, replacing the oddly crippled version in Toolbox. The shell is still the BSD Korn shell, but a later version. Both adb and logcat work as expected.
The basic directory layout is the same as Android: the init program and init*.rc scripts are in the root, which is an initramfs (ramdisk). The main system files are stored in the read-only system directory, which is much cut-down from Android:
# ls -p /system
bin/ build.prop etc/ lib/ usr/ xbin/
Run-time data storage is in /data, as normal. In here you find:
# ls -p /data
adb/      app-private/  data/       mediadrm/        resource-cache/
anr/      backup/       drm/        misc/            ss/
app/      bootchart/    local/      nativebenchmark/ system/
app-asec/ bugreports    lost+found/ nativetest/      tombstones/
app-lib/  dalvik-cache/ media/      property/        user/
There are some Dalvik related directories which I take to be atavistic vestiges from Android, but I could be missing something here, who knows?
Finally, this is the list of processes (with kernel threads removed for brevity):
# ps
USER      PID   PPID  VSIZE  RSS   WCHAN            PC  NAME
root      1     0     7820   1820           0 08143195 S /init
[...]
root      981   1     3548   1476           0 0812f640 S /sbin/ueventd
[...]
logd      1254  1     12304  2972           0 b75b1df1 S /system/bin/logd
dbus      1257  1     6124   3204           0 b738fbd0 S /system/bin/dbus-daemon
system    1258  1     6400   2024           0 b755bad6 S /system/bin/servicemanager
shell     1261  1     4864   1720           0 b74bcdf1 S /system/bin/sh
root      1262  1     7548   1024           0 0811d050 S /sbin/adbd
keystore  1264  1     9384   4164           0 b714aad6 S /system/bin/keystore
media     1265  1     32144  11788          0 b70d9ad6 S /system/bin/mediaserver
system    1266  1     9104   4084           0 b730b8d5 S /system/bin/nativepowerman
root      1267  1     9208   3860           0 b75498d5 S /system/bin/peripheralman
root      1268  1     11280  4236           0 b7325ad6 S /system/bin/sensorservice
wifi      1269  1     10900  4380           0 b7347c55 S /system/bin/wpa_supplicant
audioserver 1270  1     18608  8568           0 b6af28d5 S /system/bin/brilloaudioservice
root      1272  1     4864   2432           0 b744fc55 S /system/bin/sh
metrics_coll 1273  1     11840  5772           0 b70ff8d5 S /system/bin/metrics_collector
metricsd  1274  1     12804  5808           0 b74ec8d5 S /system/bin/metricsd
root      1275  1     5408   1828           0 b74d9da1 S /system/xbin/perfprofd
trunks    1277  1     13268  5112           0 b70938d5 S /system/bin/trunksd
root      1278  1     15048  7852           0 b71f58d5 S /system/bin/update_engine
webserv   1280  1     12848  6968           0 b71bf8d5 S /system/bin/webservd
root      1300  1     13640  8760           0 b72c18d5 S /system/bin/shill
firewall  1328  1     10524  6628           0 b73aa8d5 S /system/bin/firewalld
dhcp      1340  1300  6208   1900           0 b75c58d5 S /system/bin/dhcpcd-6.8.2
system    1342  1     6408   2100           0 b7353bd0 S avahi-daemon: running [linux.local]
tlsdate   1343  1     6836   3584           0 b72b98d5 S /system/bin/tlsdated
system    1344  1     16740  8888           0 b6e9b8d5 S /system/bin/weaved
root      1345  1343  6708   368            0 b72bafa6 S /system/bin/tlsdated
system    1347  1300  5172   1756           0 b7572c55 S /system/bin/dnsmasq
root      1352  1261  4864   2476           0 b7580df1 S /system/bin/sh
root      1370  1352  6208   2268           0 b7538fa6 R ps
Among the daemons you can see running, many are to do with network connectivity: wpa_supplicant, shill, firewalld, dhcpcd-6.8.2, avahi-daemon and dnsmasq. Then there is the Weave protocol manager, weaved, and a web server, webservd. Some components are obviously using binder to communicate: servicemanager and sensorservice, for example. And there is dbus-daemon...
Plainly there is still a lot to learn here. I will be following up with more blogs as time goes by.
02/23/2016 - 11:13
The story of how Linux grew to become a world-class embedded operating system is a fascinating tail of individual endeavour and collective cooperation. See the slides and accompanying paper from Chirs Simmonds' presentation at Embedded World 2016 for the full monty
Slides: http://2net.co.uk/slides/ew2016-embedded-linux-timeline-slides.pdf
Paper: http://2net.co.uk/slides/ew2016-embedded-linux-timeline-paper.pdf
02/23/2016 - 11:07
Writing device drivers to control new hardware can be hard work. Chris Simmonds, speaking at Embedded World 2016, explains how to take the easy road by writing userspace drivers.
Slides: http://2net.co.uk/slides/ew2016-userspace-drivers-slides.pdf
Paper: http://2net.co.uk/slides/ew2016-userspace-drivers-paper.pdf
Sample code: http://2net.co.uk/downloads/ew2016-demos.tar.gz
08/14/2015 - 17:46
One of the fundamental questions programmers ask (or at least, they should) is: how much memory is my program using? It may be a simple question, but with a virtual memory operating system like Linux the answer is quite complex. The numbers given by top and ps don't really add up. Procrank is a tool commonly used by Android platform developers to give more accurate answers, but there is no reason why it can't be more widely used in other Linux based operating systems and it is especially useful for embedded Linux.
The code
You can get the code from Github: https://github.com/csimmonds/procrank_linux.git
There are instructions about building and usage in the README
The theory
The two most common metrics for the memory usage of a process are the virtual set size, Vss, and the resident set size, Rss: you will see see these numbers in ps and top.
Vss, also called VIRT and VSZ is the total amount of virtual memory of the process has mapped, regardless of whether it has been committed to physical memory
Rss, also called RES and RSS, is the amount of physical memory being mapped
The Vss is plainly an overestimate because applications commonly allocate memory they never use. Rss is a better measure, but still an overestimate because it does not take into account pages of memory that are shared between processes. For example, there is only one copy of the C library resident in memory because it is shared between all the processes that link with it yet Rss accounts for it multiple times.
Some years ago, Matt Mackall looked at the problem and added two new metrics called the Unique Set Size, Uss, and the Proportional Set Size, Pss, and modified the kernel to expose the information needed to calculate them, which you will find in /proc/[PID]/smaps.
Uss is unique set size, which is the amount of memory that is private to the process and is not shared with any other
Pss is the proportional set size, which is the amount of memory shared with other processes, divided by the number of processes sharing each page
To over simplify slightly, the diagram below shows three processes and the pages each has mapped into its virtual address space. The pages have been marked as being of type A, B or C where:
- A = private memory that is mapped to physical pages of RAM. This would include the parts of the stack and heap that are being actively used
- B = shared memory that is mapped and is shared by one or more other processes, e.g. code in shared libraries
- C = memory that has been allocated but never touched
And so for each process:
- Vss = A + B + C
- Rss = A + B
- Uss = A
- Pss = A + B/n where n is the number of processes sharing
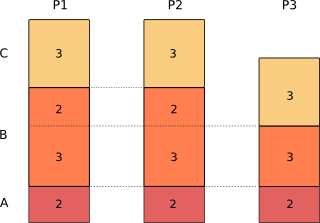
Calculating the Pss for the three processes gives:
Pss(1) = 2 + 3/3 + 2/2 = 4
Pss(2) = 2 + 3/3 + 2/2 = 4
Pss(3) = 2 + 3/3 = 3
Sum(Pss) = 11 = total of pages in use
As you can see, Pss gives an accurate measure of the memory a process is using, taking into account sharing between processes. The total amount of memory in use by all processes is the sum or their Pss.
The Uss is also useful because it shows the pages that are unique. You can think of it as the price you would pay in memory if you forked that process to create a copy.
There is a readily available program that shows Uss and Pss called smem, developed by Matt Mackall. The only problem with it is that it requires a Python run-time environment, which is not often available on an embedded Linux device. The Android developers encountered this problem and they wrote procrank as a command-line tool written in C, using the Android BIONIC C library. I have taken that code, made a few minor changes and added a Makefile so it will compile on most GNU/Linux environments, including cross compiling for embedded use.
 Twitter
 GitHub